The single-responsibility principle is core concept of the SOLID principles of writing good code. This can also be applied to UI components. We can pull all of the components needed into it’s own isolated component and supply it with the data needed to display. This becomes especially useful when adding a custom set of views in a Recycler view when we can just hand the ViewHolder a specific view component, it’s entity, and not have to fumble around with all the subviews ids in every RecyclerView we use it in. But, enough talk, let’s get into it.
First, you want to create the model we’re going to use to display data.
Create a new data class named ViewModel.kt with the following contents.
data class ViewModel(
  val title: String,
  val subtitle: String
)
This is the data model that will be used when setting the text fields in the layout. You’ll soon see how this will be used to display the data in the xml.
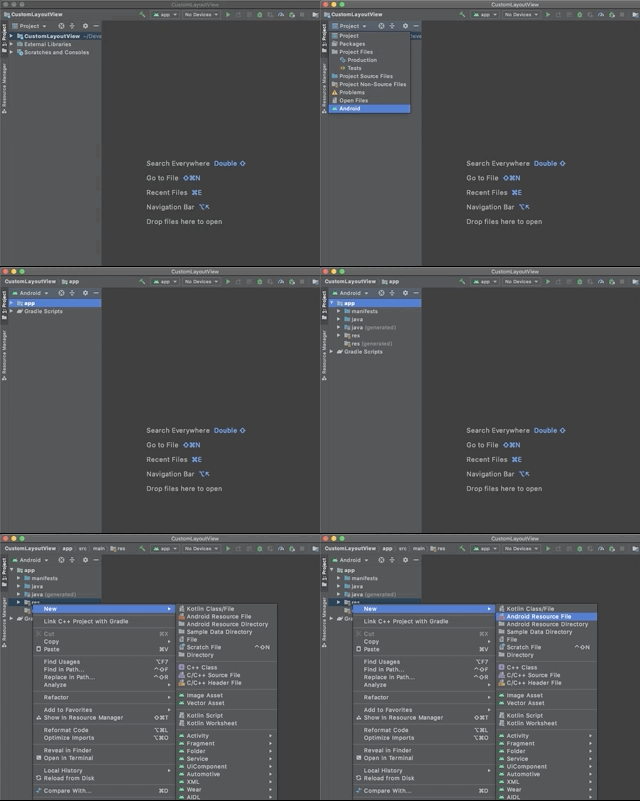
Next, let’s create a resource file named view_custom_layout.xml

In the next screen, select the following options: File name: view_custom_layout Resource Type: Layout
Leave the rest as is and select Ok
You’ll see on the right side of the Android Studio window, below the open files tab, there is a Code | Split | Design option. You’re going to want to select Code.

Type the following into the editor
<?xml version="1.0" encoding="utf-8"?>

<layout xmlns:android="http://schemas.android.com/apk/res/android">

    <data>
        <variable
            name="viewModel"
            type="dev.antlip.customlayoutview.ViewModel" />
    </data>

    <merge>

        <TextView
            android:text="@{viewModel.title}"
            android:layout_width="match_parent"
            android:layout_height="wrap_content" />

        <TextView
            android:text="@{viewModel.subtitle}"
            android:layout_width="match_parent"
            android:layout_height="wrap_content" />

    </merge>
</layout>
Why is the layout there?
When using DataBinding, the layout tag must be used around the views you are binding. Followed by a data tag that describes which class you will be setting the data with. In our case this is the ViewModel class we created earlier, and we gave it the name (lowercase) viewModel. The type, is the package and file name of the object you would like to use.
What is the merge tag doing?
In the next class we are creating, we are going to extend from LinearLayout, so in order to reduce overdraw, we use the merge tag around our two TextViews which will be inflated directly into the view we are creating in code.
@{} isn’t a string resource!
You’re right, and very observant. This is how we are accessing the data in our viewModel described above in our data tag. The data stored in the viewModel properties are now set on our views, and will update if the viewModel properties update.
Now that we have our layout, we’re going to create the Kotlin class needed to use this view in other places of our app.
Let’s create another Kotlin class named CustomLayoutView.kt with the following contents
import android.content.Context
import android.util.AttributeSet
import android.view.LayoutInflater
import android.widget.LinearLayout
import androidx.databinding.DataBindingUtil
import dev.antlip.customlayoutview.databinding.ViewCustomLayoutBinding

class CustomLayoutView(context: Context, attrs: AttributeSet? = null, defStyleAttr: Int = 0) :
    LinearLayout(context, attrs, defStyleAttr) {
    private val binding: ViewCustomLayoutBinding = DataBindingUtil.inflate(
        LayoutInflater.from(context),
        R.layout.view_custom_layout,
        this,
        true
    )

    init {
        orientation = VERTICAL
    }

    fun setViewModel(viewModel: ViewModel) {
        binding.viewModel
    }
}
Why are we extending LinearLayout?
You are able to extend any layout class you like, in this instance I chose LinearLayout because it’s easy to stack basic elements without much code, like constraining to the top, left, and right would be in a ConstraintLayout, though it is very powerful.
How come you didn’t use the normal inflate() method in the superclass?
Because we’re databinding, we need to inflate differently to allow the underlying classes to initialize the data and properties. We also want to attach what we are inflating, to the view we are currently initializing.
The binding was used as a property because it also initializes when the class is initializes and we know we have some of our properties like context. The only thing left to do is set the orientation in the initializer.
setViewModel?
This method allows us to use app:viewModel="" when consuming this view in other layout files. When we get the data, we simply forward the viewModel we received to our current binding and the rest is handled.
And that’s it. Once your code compiles, you should be able to use your new CustomLayoutView in other xml files.